
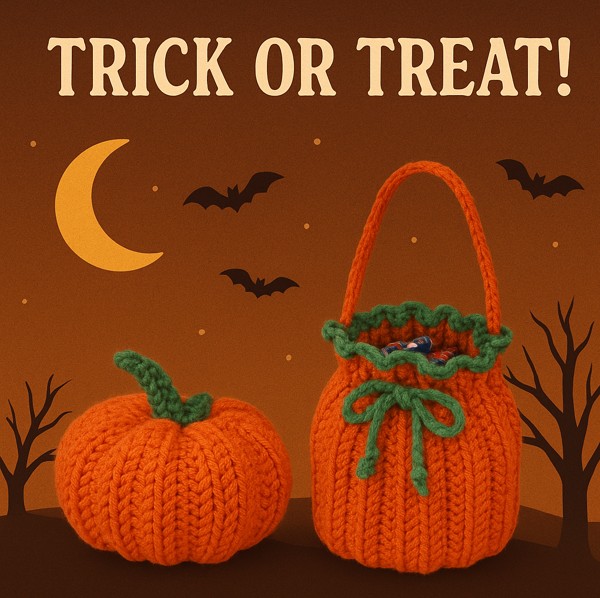
Free Crochet Pumpkin Pattern
If you’re looking for a quick and satisfying autumn project, this little crochet pumpkin is just the thing! Perfect for cosy seasonal décor, these pumpkins look lovely on a Halloween table, in a Thanksgiving display, or simply dotted around your home for that autumnal handmade touch.
FREE PATTERNS
Carol Ibbetson
9/3/20258 min read
Free Crochet Pumpkin Pattern
If you’re looking for a quick and satisfying autumn project, this little crochet pumpkin is just the thing! Perfect for cosy seasonal décor, these pumpkins look lovely on a Halloween table, in a Thanksgiving display, or simply dotted around your home for that autumnal handmade touch.
They’re brilliant stash-busters too – use up those leftover bits of yarn in different colours, sizes, and textures, and before you know it you’ll have a whole pumpkin patch. I love making these for gifts, table settings, and to decorate my own home – they work up so quickly, you’ll be hooked!
Grab your free pumpkin pattern below
The free version is below – written in UK terms first & then US.
If you prefer a PDF version of both this pumpkin and the Trick or Treat Bag, you can purchase the pattern for these below.
👉 [Get the pattern on Coolwool.net]
👉 [Get the pattern on Ravelry]
UK TERMINOLOGY
Materials
I used:
1 x 100g ball of Lion Brand 24/7 cotton in 133 Tangerine (yarn A)
1 x 10g ball of Scheepjes Catona cotton in 412 Forest Green (yarn B)
1 x 3.5mm (US E4, UK9) crochet hook
but any yarn can be used with a suitable size crochet hook
20g of fibrefill stuffing
Tapestry needle
Tension/Gauge
My tension is:
24 sts and approx. 14 rows to 10cm (4in) square over the half treble crochet through third loop only using a 3.5mm hook.
Tension isn’t critical for this project – your pumpkin will simply come out bigger or smaller depending on the yarn and hook you choose.


Finished Size
Your pumpkin will measure 28cm (11in) in circumference and 5cm (2in) tall, when using the same yarn and hook.
Abbreviations (UK Terms)
ch chain
dc double crochet
dc2tog double crochet two stitches together (1 stitch decreased)
htr half treble crochet
tr treble crochet
RS right side of work
ss slip stitch
st(s) stitch(es)
WS wrong side of work
A Note on the Pattern
The htr are worked in the ‘third’ loop at the front of the work to give a ridge along the work. If you look at the top of the row you are working into you will see the normal ‘V’ at the top of each stitch.
In front of that is another loop, this is the one you work into (in fact there are two loops but we want the top one which is the larger of the two).
In this photo the yellow arrows show this third loop. The red arrows show the front loop of the top of the ‘V’ (the back loop of the top ‘V’ cannot be seen here).


Crochet Pumpkin Pattern (UK Terms)
Using 3.5mm hook, chain 15 using yarn A. Do not pull the chains too tight as you work them.
Row 1 (WS): Htr in second ch from hook, htr in each remaining ch, turn. (14 sts)
Row 2: Ch2 (does not count as a st), htr in the third front loop in each st to the end, turn. (SEE PATTERN NOTE AND PHOTO ABOVE).
Rows 3 to 30: Repeat row 2.
Fasten off leaving a long tail. Whip stitch across the join as shown attaching the beginning chain to the third loop of the last row, stitch for stitch, to make another ridge.


Top & Bottom Sections, worked in the round
Join yarn A to one edge of the last row, with a ss at the top of one of the ridges (leaving a long tail), ch1, dc in the same place, *dc in the space between this ridge and the next one, dc in the next ridge; repeat from to the end, ss to first dc to join (30 sts).
Next round: *dc2tog, dc; repeat from * all around, join with a ss in the first dc (20 sts)
From here on you will work in a spiral so do not join at the end of a round. Dc2tog all around and continue until the whole circle is closed. Fasten off leaving a long tail.
Stuff the pumpkin firmly and then repeat from this whole process to close the other end of the pumpkin.
Making Up
Using one of the tails and the tapestry needle, thread the tail up through the centre of the pumpkin and then back down a few times to create a dent in the top and bottom. Use the remaining tails to wrap around the pumpkin every 2 or 3 ridges and then back through the middle, pull to accentuate the ridges.


Your pumpkin is now ready to go – all we need now is a cute stalk with it’s leaf!
Stalk
Using 3.5mm hook, chain 5 using yarn B. Join in the first chain with a ss to make a circle.
Dc in the back loop of each ch around, do not join but continue to work dc through the back loop of each st in a spiral until the stalk measures approx. 2cm (3/4 in).
Thread yarn through the 5 sts and pull to close. Fasten off.
Sew the stalk to the centre of the top of the pumpkin all around the base of the stalk.
Leaf
Using 3.5mm hook, chain 9 using yarn B.
Row 1: 1dc in second ch from hook, 1htr, 3tr, 1htr, 1dc, ss, turn to work on the other side of the ch, and work ss, 1dc, 1htr, 3tr, 1htr, 1dc, ss into beginning ch and fasten off.
Sew to the side of the stalk firmly and weave in all ends.


Add your pumpkin to your pumpkin patch and make another one!
US TERMINOLOGY
Materials
I used:
1 x 100g ball of Lion Brand 24/7 cotton in 133 Tangerine (yarn A)
1 x 10g ball of Scheepjes Catona cotton in 412 Forest Green (yarn B)
1 x US E4 (3.5mm, UK9) crochet hook
but any yarn can be used with a suitable size crochet hook
20g of fibrefill stuffing
Tapestry needle
Tension/Gauge
My tension is:
24 sts and approx. 14 rows to 4in (10cm) square over the half double crochet through third loop only using an E4 hook.
Tension isn’t critical for this project – your pumpkin will simply come out bigger or smaller depending on the yarn and hook you choose.
Finished size
Your pumpkin will measure 11in (28cm) in circumference and 2in (5cm) tall, when using the same yarn and hook.
Abbreviations (US Terms)
ch chain
sc single crochet
sc2tog single crochet two stitches together (1 stitch decreased)
hdc half double crochet
dc double crochet
RS right side of work
sl st slip stitch
st(s) stitch(es)
WS wrong side of work

A Note on the Pattern
The hdc are worked in the ‘third’ loop at the front of the work to give a ridge along the work. If you look at the top of the row you are working into you will see the normal ‘V’ at the top of each stitch.
In front of that is another loop, this is the one you work into (in fact there are two loops but we want the top one which is the larger of the two).
In this photo the yellow arrows show this third loop. The red arrows show the front loop of the top of the ‘V’ (the back loop of the top ‘V’ cannot be seen here).
Crochet Pumpkin Pattern (US Terms)
Using E4 hook, chain 15 using yarn A. Do not pull the chains too tight as you work them.
Row 1 (WS): Hdc in second ch from hook, hdc in each remaining ch, turn. (14 sts)
Row 2: Ch2 (does not count as a st), hdc in the third front loop in each st to the end, turn. (SEE PATTERN NOTE AND PHOTO ABOVE).
Rows 3 to 30: Repeat row 2.
Fasten off leaving a long tail. Whip stitch across the join as shown attaching the beginning chain to the third loop of the last row, stitch for stitch, to make another ridge.
Top & Bottom Sections, worked in the round
Join yarn A to one edge of the last row, with a sl st at the top of one of the ridges (leaving a long tail), ch1, sc in the same place, *sc in the space between this ridge and the next one, sc in the next ridge; repeat from to the end, sl st to first sc to join (30 sts).
Next round: *sc2tog, sc; repeat from * all around, join with a sl st in the first sc (20 sts)
From here on you will work in a spiral so do not join at the end of a round. Sc2tog all around and continue until the whole circle is closed. Fasten off leaving a long tail.
Stuff the pumpkin firmly and then repeat from this whole process to close the other end of the pumpkin.
Making Up
Using one of the tails and the tapestry needle, thread the tail up through the centre of the pumpkin and then back down a few times to create a dent in the top and bottom. Use the remaining tails to wrap around the pumpkin every 2 or 3 ridges and then back through the middle, pull to accentuate the ridges.
Your pumpkin is now ready to go – all we need now is a cute stalk with it’s leaf!
Stalk
Using E4 hook, chain 5 using yarn B. Join in the first chain with a sl st to make a circle.
Sc in the back loop of each ch around, do not join but continue to work sc through the back loop of each st in a spiral until the stalk measures approx. ¾in (2cm).
Thread yarn through the 5 sts and pull to close. Fasten off.
Sew the stalk to the centre of the top of the pumpkin all around the base of the stalk.
Leaf
Using E4 hook, chain 9 using yarn B.
Row 1: 1sc in second ch from hook, 1hdc, 3dc, 1hdc, 1sc, sl st, turn to work on the other side of the ch, and work ss, 1sc, 1hdc, 3dc, 1hdc, 1sc, sl st into beginning ch and fasten off.
Sew to the side of the stalk firmly and weave in all ends.
Add your pumpkin to your pumpkin patch and make another one!
LEGAL STUFF
This pattern is for private use only, and it may not be shared wholly or partially with any third party. The pattern may not be copied, modified, shared or sold in any format. You may sell the finished items but please credit me as the designer, and add my instagram name, facebook name or email to a document sold with each item.
If you are happy to, please share your crochet progress or your finished version of the Halloween pumpkin on social media with the hashtags #halloweenpumpkin and #coolwooldesign.
All queries should be directed to Carol via e-mail: carol@coolwool.net
I can be found on Instagram, TikTok, Facebook and Pinterest with the handle @coolwooldesign
If you would like to know when I release new free patterns on the blog
SUBSCRIBE BELOW
⬇️⬇️⬇️